
The Magic of Symbolic Bead Embroidery
Hello and welcome to the first instalment For the Curious & Creative!!
Today I'm excited to talk to you about magical, illustrative bead embroidery. I'm not talking about a mindless hobby to kill some time whilst making a pretty wall piece, I'm talking about the medicinal practice of it. Needlework can soothe and nourish and has the ability to heal trauma and stress. It's a slow, mindful and meditative practice which gently forces the mind inward and away from external distractions. It creates the opportunity for deep reflection and it opens up space for clarity of thought - problem solving, creativity and new ideas.

I feel the same way about weaving too and find it interesting that both tapestry weaving and embroidery were used in hospitals as therapy to treat and rehabilitate WW2 soldiers suffering from PTSS because of their calming and focusing effects on the mind. I love weaving, and those of you who have been on this journey with me for a while will know that weaving laid the foundations of Wandering Coast. But weaving also led me to the amazing world of bead embroidery.
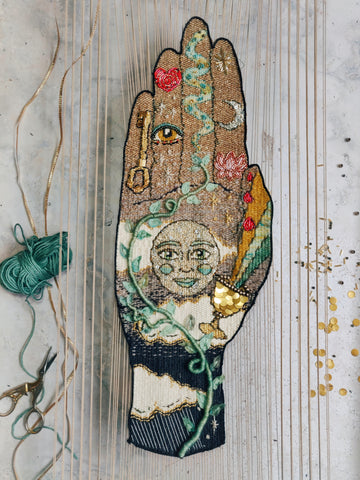
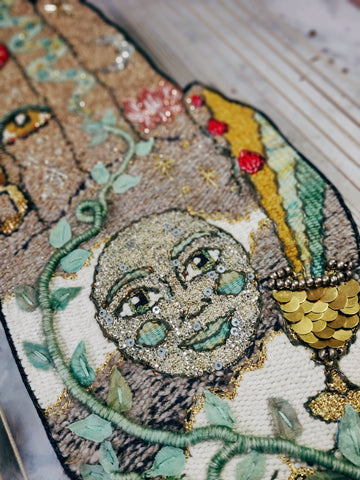
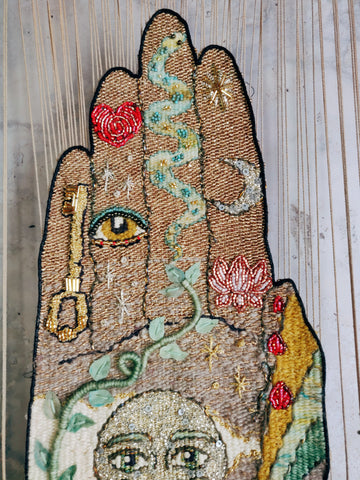
When designing this woven piece pictured below called 'The Alchemist Hand', I knew that I wouldn't be able to get all the detail I wanted by weaving alone, and so I incorporated bead embroidery to accentuate some of the more delicate areas of the design. I immediately fell in love with the process, and I loved the way it defined some of delicate details, but I also loved the way it added something extra, a little sparkle and pizazz.
This led me to experimenting more with bead embroidery, and it was a great way to use lovely scraps of fabric that I'd been squirreling away and never knew what to do with. I would choose a symbol I really resonated with, like a shell or a Sacred heart, I'd draw it onto my fabric, choose some beautiful seed beads, or as my mum likes to call them "love beads" because she's a 60's/70's hippie, and suddenly, I realised I had this beautiful meditative practice at my fingertips!
Not only is it now a medicinal thing for me, but it's also another art medium in which I love to work and I have been using it to tell stories through illustration.
I will be teaching illustrative and symbolic bead embroidery in 2024, so keep checking in for more updates, but in the meantime I'd like to share with you some of the best tips, tools and supplies for getting started.
What You'll Need
- A small embroidery hoop (4 or 5 inch)
- A square of medium weight cotton or linen/vintage hanky or doily
- A water soluble fabric marker
- Bead embroidery needles
- Strong bead embroidery thread (Miyuki or KO)
- A selection of glass seed beads
I've included Amazon links above so you can view the correct products regardless of where you are in the world, but I would highly recommend purchasing from your local independent stores wherever you can. If you're from the UK, I've added links to the local stores I purchase from throughout this post.
Please read through the method below before purchasing anything on the list above as I'll also be mentioning some alternatives you might like to use depending on your preferences or project.
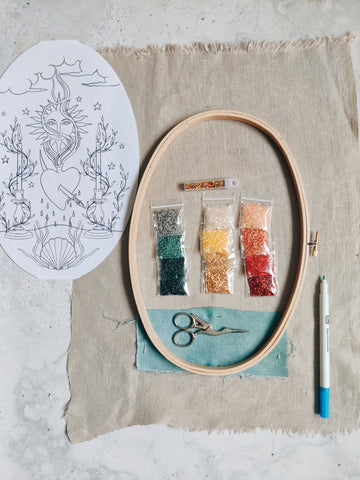
- Choose yourself a good quality embroidery hoop. I have found out the hard way that cheap embroidery hoops don't always hold the fabric securely and it can slacken whilst you work which will lead to loose stiches or a warped design, making life stressful, and remember, this is meant to be a soothing practice! If you're new to embroidery then I recommend a small 4 or a 5 inch hoop. The beads are small, so you won't want a huge surface to fill or it will take you ages (the design examples I'm sharing below are designed for a 5 inch hoop, but if you want to try a simpler design without quite so much detail then a 4 inch would work perfectly).
- Select your fabric. You can honestly use whatever type of fabric you want to but if you're a beginner then I recommend a nice crisp linen or cotton. If it's too light like silk, organzer or velvet, and you're not used to working with them, they can be very slippery and fiddly on the embroidery hoop. I bought several meters of linen to make some curtains for my old studio with, but then never got around it it, so I've been cutting it up into squares to use for embroidery and it's perfect. My favourite thing to use, however, are vintage fabrics. You can use vintage handkerchiefs, old table cloths etc. I love using these as it introduces a deeper element to the finished piece when the cloth itself holds an unspoken story. Once you've selected the fabric you'd like to use, cut a square of it, no less than 2 inches larger than your hoop. Alternatively you may not want to cut it at all if you're using a lovely vintage hanky or doily. Unscrew the embroidery hoop and separate the rings then lay your fabric square/ hanky/ doily over the hoop without the screw. Place the ring with the screw over the top and start tightening the screw whilst gently pulling at the edges of the fabric, making sure it sits across the hoop nice and taught like a drum.
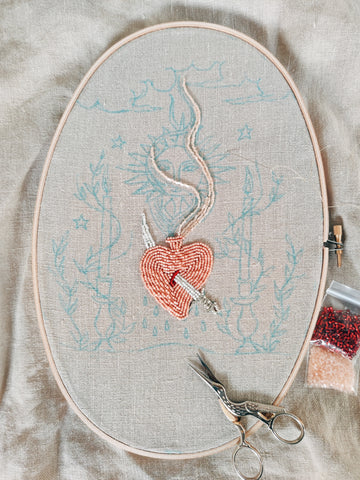
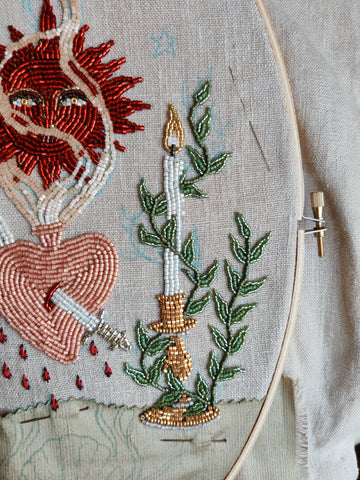
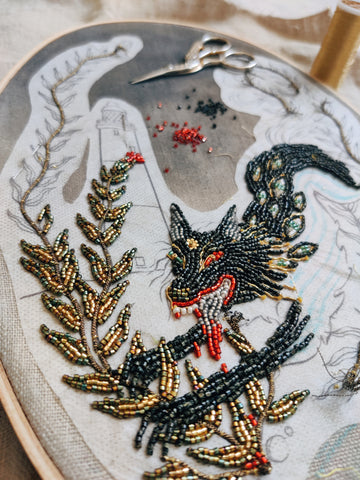
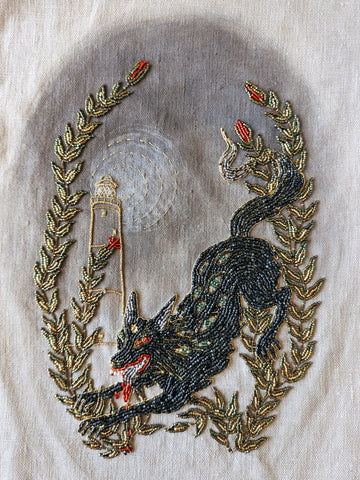
- Next you'll need to choose your design. I find the best way to choose is to pick a symbol that means something to you. I live by the sea so I tend to gravitate towards seashells. I think the seashell is a wonderful symbol of the place I call home and also reflects my love of the ocean. You can also pick something that symbolises your ancestry, your beliefs, or maybe even some local folklore. Perhaps you want to choose a symbol that simply brings feelings of hope and happiness. Whatever it is, choose something you find evocative. If you're using a 5 inch hoop then keep your design under 10cm.
Here are some examples of some symbols you might like to choose below. You can download the FREE templates of them here. Don't forget to join my newsletter for more free templates and guides.


- Time to choose your beads! I like to use Japanese (Miyuki Delica) glass beads or seed beads. I usually get a selection in sizes 11/0 and 10/0. If I have a larger space to fill then I use the size 10/0 as they're bigger but for finer detail I use 11/0 (the higher the number, the smaller the bead). If you're a beginner then I recommend starting with size 10/0 or even 8/0 whilst learning the technique and finding your flow They are available in hundreds of different colours and finishings so it can be a bit overwhelming and it's easy to go a bit berserk and before you realise, you've got £100 worth of tiny beads in your shopping basket. So if you want to avoid that, first decide on your colour palette (2 or 3 colours you think would best suit your small chosen design) before you go anywhere near the bead shop. It's also worth noting that you can find amazing seed beads second hand. I've bought so many on Ebay and Vinted. You can get a job lot for a fiver or less, where as buying them new can get expensive. I even buy pretty thrifted jewellery and use the beads. I often use pearls in my work but I don't like buying pearls for ethical reasons, so I use glass imitation pearls, and in the past I've thrifted some strings of freshwater pearls, second hand which I feel isn't as bad as buying them new.
- Now you need to decide how to transfer your design to your fabric. My two favourite ways of doing this are with either a water soluble fabric marker, OR using water soluble stabiliser.
I've been using water soluble fabric markers for years, They're one of the most important tools in my embroidery kit. They are so easy to use, you just draw your design directly onto the fabric and once you've finished the embroidery, you can remove the pen with a damp cloth or sponge and it completely disappears. If it's a larger design you're working on over a few weeks, the ink can fade a bit, so I just retouch it as and when I need to. I've added a link for the markers above but you should be able to buy them from your local sewing shop. These markers are great for smaller, simpler designs like the ones we're talking about today.
Then there's water soluble stabiliser. The particular type I like to use is printer friendly, so you can print your design straight on to the stabiliser like paper, or if you prefer, you can just draw your design directly on the stabiliser with a pen or pencil. Once you have transferred your design to the stabiliser, cut around it neatly (leaving a little border, see example below). The kind I use is adhesive, so you just peel off the adhesive backing and carefully place it on top of your fabric. If it's not an adhesive version, you can just pin it onto your fabric. I tend to use a few pins regardless, to secure it in a few places as the adhesive can come unstuck around the edges if you're handling the embroidery a lot whilst you're working on it.
Once you've finished the embroidery you can submerge it in warm water and the stabiliser will completely dissolve. I love using this stuff because I can print my digital designs straight on to it, without having to redraw everything which is amazing when I'm working on a larger detailed piece, and it also (as the name suggests) strengthens the area you're embroidering over which always gives me peace of mind. I use Sticky Fabri-Solvy by Sulky. It's quite expensive but you can purchase single sheets from various vendors on Etsy if you want to give it a try. If you don't want the sticky version, Sulky also offer a non adhesive option.

Example using water soluble stabiliser for bead embroidery
- Once you've transferred your design onto the fabric then you're almost ready to go! You'll just need to grab a bead needle and your strong bead embroidery thread. I purchase these from the same place I buy my beads to ensure they're compatible. Search for Miyuki compatible needles and thread to make sure they're compatible with the tiny beads you'll be using. I generally use a 0.4mm x 48mm, but a few mm shorter or longer than that is fine. They are thin and easy to lose so make sure you look after them. I also use either the Miyuki beading thread or KO thread. I buy my beading supplies from either Delicas, CJ beaders or Peppy in the UK.
So that's it for the essential tools and supplies. If you'd like me to share some bead embroidery techniques then please leave a comment below and I can do a PART 2!
I hope this has been helpful. I find that often the most daunting part of trying something new is figuring out which tools and supplies to use and where to find them, so I hope this gives you the confidence to go and source what you need.
Big love, Jennifer x
P.S. Sometimes I'll be sending out free digital gifts relevant to my blog posts, like creative templates or guides and sometimes free downloadable art for you to print at home. So remember to join my mailing list so you don't miss out!
5 comments
This is so helpful! Can’t wait for part 2 💕
I look forward to part 2
Your bead embroideries are beautiful! I would love a part 2 to learn more.
This is so helpful, thank you!! Your work is on another level gorgeous.
Such beautiful work and a very informative guide, thank you!